|


| |
Requirement:
- Directory /usr/sap/put must have 610 MB.
- Oracle = 7.7 GB extended.
Result of prepare can be seen in directory /usr/sap/put/log/CHECKS.LOG
If /usr/sap/put not exist, create with user root and the owner :
<sapsid>adm
cd /usr/sap/put
ls –ld *
rm –rf *
Insert CD Sap Kernel
- su – hrxadm
- cd /usr/sap/put
- /sapcd/UNIX/PREPARE
- choose SERVER
- Starting Upgrade Assistant Server.
- run as root
- edit file .cshrc with following :
set path=($path /usr/bin)
setenv CLASSPATH /usr/lib/class.zip:/usr/sap/put/ua/ua.zip
- Start Upgrade Assistant Server with :
java UaServer
- Starting R/3 Upgrade Assistant GUI
- Open new window
- Run as root
- setenv DISPLAY <hostname>:0.0
- java UaGui
- Starting GUI on windows Hosts
- Open Internet Explorer
http://<hostname>:4239/ua/UaGui.html
login as administrator password admin
or login as observer password observer
Pre-Check
- Check parameter in DEFAULT.PFL in /usr/sap/<SID>/SYS/profile :
Send on, exeauto (several R/3 instances are installed for this R/3
system.
Send off, exeauto (one instance is installed for this R/3 system)
- Ensure parameter rdisp/bufrefmode is not set in instance profile.
- Create 4 tablespaces for repository switch in different disk.
PSAPES40BD, PSAPES40BI, PSAPEL40BD, PSAPEL40BI.
- Check RDDIMPDP in SAP whether it is running or not, if not run RDDNEWPP in transaction
/nse38.
- Check list in CHECKS.LOG, find out the transports that are not release right now.
- Logon onto R/3.
- /nse01 and choose find.
- Enter REPA in field Type.
- Execute.
- Repair ŕ release repair.
- Edit ŕ Confirm repair.
- If cannot logon using particular user ID ŕ Edit ŕ change owner.
- Check :
- select * from dba_sys_privs where grantee = ‘SAPR3’;
and the result should contain :
grantee = ‘SAPR3’, privilege = ‘UNLIMITED TABLESPACE’, adm =
‘yes’
grantee = ‘SAPR3’, privilege = ‘UNLIMITED TABLESPACE’, adm =
‘no’
if not contain :
grant unlimited tablespace to sapr3;
- Make sure :
TABLE
MAX EXTENTS NEXT EXTENTS
TERCL
200
500KB
<index on TERCL> 200
500KB
TERCL3
200
500KB
<index on TERCL3> 200
500KB
add using :
- sapdba
- d. Reorg
- b. alter/show table or index storage parameter
- b. table/index
- enter TERCL%
- Logon to client 000 as DDIC, password 19920706
- Delete unnecessary client.
- Setting the op mod for upgrade.
Check using transaction /nrz04, including the op mod DUMMY.
- Start /nrz04
- Select op mode ŕ Create
- Enter name for op mode, eg: upgrade.
- Instance required for upgrade has been start up.
- Position the cursor on new op mode and choose op mode ŕ
maintain instances ŕ instance/op modes. Select Settings ŕ Based on act.status ŕ New
Instances ŕ Create and select save.
- Enter created op mode as active op mode for 24 hours with transaction /nsm63.
Start Upgrade
Requirements :
- R/3 Upgrade assistant must be active.
- Prepare modules ŕ finished successfully.
- No file may have been deleted in directory /usr/sap/put.
- Preparation not supported by prepared have been executed.
Calling
- Start GUI of R/3 upgrade assistant
- Choose administrator ŕ start R/3 up.
Upgrade log in /usr/sap/put/log.
Phase INIT PUT
One entries was incorect ŕ correct with
command : R3up set stdpar
To connect entry of passwor of user DDIC ŕ
R3up set DDIC pwd
Using GUI :
- Main menu choose ŕ Admin ŕ
Start R3up with option.
- Enter option set stdpar or set DDIC pwd.
Phase DBCHK
Check /usr/sap/put/log/SLOG40B. (error message because there is not
transport system).
Run /nse06 ŕ choose new installation ŕ select correct system configuration, choose create button.
Step :
- Administrator ŕ connect to R3up.
Figure 1.1. R/3 Upgrade Assistant
Enter system ID : HRX.
Select Database : Oracle.
R/3 Upgrade control program : cont <enter>.
Figure 1.2. R/3 Upgrade Control Program
Help language : E.
Select, ok.
Figure 1.3. Selecting Prepare Modules
Check all and ok.
Figure 1.4. Select the Prepare Modules
cp /usr/sap/put/log/CHECKS.LOG ŕ/usr/sap/put/log/CHECKS.SAV
Figure 1.5. Log Result and Warning
Execute and click OK.
Confirm R/3 system : HRX.
Confirm instance number : 01.
Sapsystem Host = academic.
Startsap path = /usr/users/hrxadm.
Kernel path = /usr/sap/HRX/SYS/exe/run.
Database ID = HRX.
System Password = manager.
Database Host = academic.
CD mount point 1 = /sapcd.
CD mount point 2 = STOP.
R3 Trans Processes = 3.
Help Language = E.
R/3 Start profile = START_DVEBMGS01_academic.
Instance profile = /usr/sap/HRX/SYS/profile/HRX_DVEBMGS01_academic.
Default profile = /usr/sap/HRX/SYS/profile/DEFAULT.PFL.
Enter DDIC password in client 000.
Verify password.
Batch host = academic.
Maximum SYNC TIME = 60.
Figure 1.6. Maximum SYNC Time
Local syslog path = /usr/sap/HRX/DVEBMGS01/log
Central syslog path = /usr/sap/HRX/SYS/global
EPS Inbox = /usr/sap/trans/EPS/in
Error because HRX system are not defined yet. Use transaction /nse06.
Figure 1.7. Error Unable to Read from Database
Error because of:
Figure 1.8. Environment Variables not Set
su - hrxadm
vi .dbenv_academic.csh
add :
setenv ORA_NLS33 /oracle/HRX/ocommon/nls/admin/data
su – hrxadm
vi .dbenv_academic.csh
add :
setenv ORACLE_HOME /oracle/HRX
setenv ORA_NLS /oracle/HRX/ocommon/nls/admin/data
setenv ORA_NLS32 /oracle/HRX/ocommon/nls/admin/data
setenv ORA_NLS33 /oracle/HRX/ocommon/nls/admin/data
Error :
Figure 1.9. Error from Prepare Phase
Extent tablespace PSAPDDICD by 142
MB.
Extent tablespace PSAPDDICI by 132 MB.
use sapdba and alter datafile.
Insert CD Report Load.
Insert CD Language disk.
R/3 add-on, select nothing else.
Figure 1.10. R/3 Add-on
Patch, select no & continue
Figure 1.11. Bind Pathes
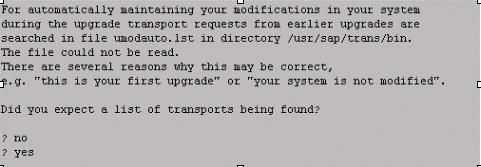
Figure 1.12. Maintaining Modification
Select No.
Prepare finished with status succeeded and failed, check at log : CHECKS.LOG.
Figure 1.13. Status of Prepare
Phase
Example of CHECKS.LOG
Figure 1.14. Example of CHECKS.LOG
Action :
- Change permission for saposcol.
chmod 777 saposcol.
chown hrxadm saposcol.
- Add datafile and create new tablespaces according to CHECKS.LOG.
- Repeat the PREPARE phase.
Prepare phase finished and choose continue.
Figure 1.15. Prepare Phase Finished
Check /usr/sap/put/CHECKS.LOG
Figure 1.16. CHECKS.LOG
Check PREPARE’s status by selecting status in this following screen :
Figure 1.17. Check Prepare's Status
Look at the result :
Figure 1.18. Result
If all phases are completed successfully then finished the prepare
phase.
Begin Upgrade
R/3 upgrade assistant, select Administrator ŕ
Start R/3 up.
- Confirm name of R/3 system = HRX.
- Instance Number = 01.
- SAP System host = academic.
- Startsap path = /usr/user/hrxadm.
- Kernel path = /usr/sap/HRX/SYS/exe/run.
- Database ID = HRX.
- System password = manager.
- Database Host = academic.
- Mount CD point = /sapcd.
- R3 Trans processes = 3
- Help Language = E
- R/3 start profile = START_DVEBMGS01_academic
- Instance profile = /usr/sap/HRX/SYS/profile/HRX_DVEBMGS01_academic.
- Default profile = /usr/sap/HRX/SYS/profile/DEFAULT.PFL.
- DDIC password client 000 : 19920706.
- Batch Host = academic.
- Maximum SYNC TIME = 60.
- Local SYSLOG PATH = /usr/sap/HRX/DVEBMGS01/log
- CENTRAL SYSLOG PATH = /usr/sap/HRX/SYS/global.
- EPS INBOX = /usr/sap/trans/EPS/in.
- Look at the following screen, the R3up keyword is 90511. (notes 91709).
Figure 2.1. R3up Keyword
- Select A_off for upgrade strategy.
Figure 2.2. Upgrade Strategy
- Define the upgrade stop : select do not stop.
Figure 2.3. Define Stop Strategy
- Select machine types.
Figure 2.4. Machine Type
- Enter number of batch processes during the upgrade.
Figure 2.5. Number of Process
During Upgrade
- Enter CD Report Load.
- Confirmation the usage of A_off strategy, choose continue.
Figure 2.6. Confirmation of A_off
Usage Strategy
- Archive Log disabled, select yes.
Figure 2.7. Archive Log Disable
- Insert CD Upgrade 1.
- Insert CD Upgrade 2.
- All secondary application servers of R/3 system HRX can be started now, select continue.
- Error occurred during the upgrade that require revision. Look at
/usr/sap/put/log/LONGPOST.LOG. Search Oss for keyword ‘TG123’. Phase PCON_40B
- Save all log file, upgrade finish.
- Language transport.
- Change /nrz10, add zcsa/system language : E.
- Run transaction /nsmlt.
- Run program rscp0004.
Post Processing Ugrade
- su – root
- cd /usr/sap/put/exe
- ./saproot.sh <SAPSID>
- exit
- su – ora<sapsid>
- svrmgrl
- drop tablespace PSAPES<startrel>D.
- drop tablespace PSAPES<startrel>I.
- drop tablespace PSAPEL<startrel>D.
- drop tablespace PSAPEL<startrel>I.
- Remove all droped tablespaces’ datafile from unix level.
- Run program RDDGENLD, using variant : SAP_REGEN_REST.
Upgrade Finished

|


